There are few things in life that I enjoy more chocolate. I mean, really. Who doesn’t love chocolate??? So, I was happy to finally make it to Raaka Chocolate in Brooklyn, where they’re making delicious chocolate, from bean-to-bar, right on site in their Red Hook factory. Each weekend, they offer tours of the factory so you can get an up close and personal look at how their delicious chocolate is made.
Oh, and did I mention there are samples???
There are samples!
History of Raaka Chocolate

Our tour guide, Ann, kicked off our tour with a little background on Raaka, which opened in 2010 and then moved to their Red Hook location in 2014. They describe themselves as a bean-to-bar chocolate maker because, unlike chocolatiers who tend to acquire pre-made chocolate to which they add their own ingredients, Raaka is actually taking the beans, grinding them down, and making the chocolate itself from raw ingredients.
They source their cocoa beans from the Dominican Republic, Peru, and Tanzania, and the beans arrive at Raaka in these giant 70-kilo sacks. Each type of beans Raaka uses has a different flavor depending on its origin, and Raaka produces their chocolate with a single origin approach. Basically, this means that each flavor of chocolate bar they make uses just one type of bean. This helps to ensure the flavor remains consistent and true to the original flavor of the specific beans.
What makes Raaka particularly unique, though, is that they do not roast their cocoa beans before turning them into tasty chocolate (their chocolate is also predominantly dark chocolate, too). Much of the chocolate that you’ve eaten has most likely been produced with roasted beans, which give the chocolate a toastier and earthier flavor.
Raaka knew that there weren’t a lot of chocolate makers using unroasted beans, and they saw an opportunity to create a product that’s a little different and that would allow customers to taste chocolate whose flavor hadn’t been altered through the process of roasting.
Where Do the Cocoa Beans Come From?
So, for starters, cocoa beans are not beans at all! They’re acutally seeds from the cocoa fruit (also spelled “cacao”), which doesn’t grow in North America (hence why it’s sourced elsewhere). I went on a tour several years ago when vacationing in the Dominican Republic and was able to see the cocoa fruit plant in person. And, I have to say, it kinda blew my mind.
The cocoa fruit is pod-shaped. It starts out green and then turns brighter colors as it ripens. The outer shell isn’t edible, but when you crack into a ripened cocoa pod, you’ll find these slimy white clumps. That’s the actual “fruit” and the seeds hiding inside the fruit are the beans. Personally, I thought the fruit looked a bit like brains, but how lucky are we that someone discovered they include magical beans of yumminess!


What I didn’t realize before taking this tour, though, is that chocolate is actually considered a fermented food. You see, cocoa farmers take all those white, slimy globs of fruit out of their pod and immediately pack them all into wooden boxes. They’ll cover them up, maybe move them around every couple of days to incorporate air (or to keep air out), and then wild yeast and bacteria already in the environment will break down the fruit.
The yeast eats all the sugars in the fruit, breaking it down into alcohol. The bacteria then breaks the alcohol down into acid, letting the bacteria get down into the seeds themselves. This process changes the seed chemically and also helps to create the chocolate flavor.
It takes about a week for this part of the process to happen. The beans are then spread out on drying decks to stop the fermentation process and dry the beans out, which usually takes another week.
Once they’re dry, they’re ready to be bagged up and shipped out to chocolate makers like Raaka!
Preparing Cocoa Beans to be Made into Chocolate
Now that we had learned where their cocoa beans came from it was time to move on to tasting them. When you crack open a bean, there’s a little bit of shell on the outside that you want to peel off. Inside that shell is what’s called the “nib”. We sampled two different nibs that Raaka uses, one from the Dominican Republic and one from Peru.

Y’all, I’m not gonna lie, they’re kinda gross. (If you have older siblings, you were probably tricked into tasting cocoa powder at some point in your childhood, and you’ll know that cocoa without sugar is just not good.) At first, the nibs don’t really taste like much of anything at all. They’re a bit gritty and bitter and chalky, but then the flavor begins to come out the more you chew it.
We sampled the Dominican bean first, which was super hard to peel. It had a tangy and almost fruity or citrusy flavor to it. The Peruvian bean, however, was completely different. It was a bit smoother and airier, and you definitely got a bit of an alcohol-y sort of vibe from it. I was surprised by how different they were!
As Ann said, though, the same concept applies to wine and coffee – differences in climate, soil, etc. will impact the flavors of foods grown in different parts of the world. When they’re deciding what other flavors they want to add to their chocolate bars, they need to consider the unique flavor profiles of the different beans they use to see which will work best for certain pairings.
And Ann was kind enough to let us try some of their finished product so we could have a better understanding of how they pick which bean to pair with certain additions (and it DEFINITELY tastes better than the plain old nibs!)
The first sample was their Pink Sea Salt bar, which was made with the Dominican bean and the second was a Cabernet Sauvignon bar made with that alcohol-y tasting Peruvian bean. Both were delicious, and I loved that Cab Sauv bar!
It tasted almost like chocolate-covered raisins or cherries and was by far my favorite of their chocolates. They actually steam the nibs over wine for an hour, and having tasted the nibs in advance, it made total sense to me why they chose to match the wine with that Peruvian bean instead of the Dominican one. They must have a lot of fun times experimenting with all the flavors there!
So, How Do Beans Become a Chocolate Bar?
If you tour Raaka Chocolate, you’ll get to see the whole chocolate-making process from start to finish. Ann led us through the factory and showed us how the magic happens!

Step One: Get the Nibs Out of Their Shells
First, the nibs are separated from their shells through a process called “winnowing”. They have their own little homemade contraption they use which basically includes a juicer, a shop vac, and several pieces of PVC pipe. The beans get cracked, the heavier nib pieces fall down (yay, gravity!) and the airy shell pieces get sucked up by the shop vac. So. Clever.

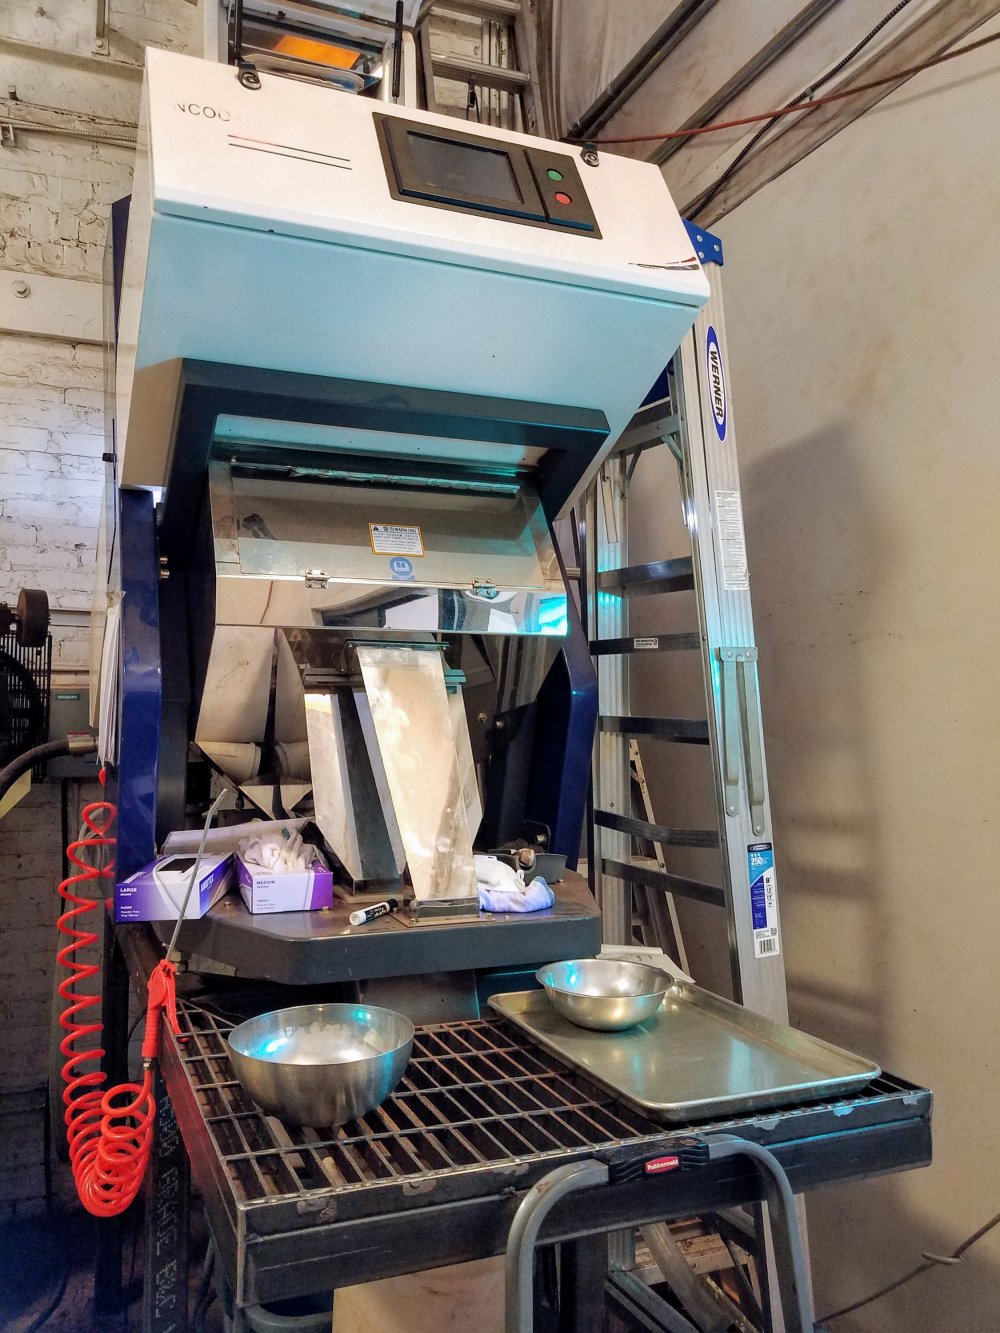
But it gets even cooler from there. Next, they run the nibs through a secondary machine called an “optical sorter”. It uses a laser to differentiate between the nibs and leftover shells and separates everything out even further. (What?!?!) The shells get puffed away and bagged up, and local farms and gardens will come by to pick them up for use as compost.
Step Two: Grind the Nibs and Add in Your Extras
Once the nibs are sorted, the magic really starts to happen. If they’re making something like the Cab Sauvignon chocolate, they’ll steam the nibs after they’re separated from their shells. If they’re not infusing any flavors into the nibs, though, they’ll head straight into the next room to start the grinding process.
The nibs are dumped into a grinder with whatever type of sweetener is being added, as well as some cocoa butter, which helps to give the chocolate a nice mouthfeel. This is also the stage where they’ll add other ingredients that may be getting added to help flavor the chocolate.
For example, they make a bananas foster-flavored chocolate bar, and they actually add caramelized sugar and freeze-dried bananas to the grinders with the cocoa nibs to help give the chocolate that yummy, caramelly, banana-y flavor.


The friction from the grinders helps to melt the nibs and you end up with swirling pots of chocolatey goodness (which we got to sample – woohoo!). This part of the process takes about 24 hours, and exposing the nibs to the air helps to refine that yummy chocolate flavor.
Since the grinders can’t 100% grind down all the chocolate, they next go into what’s called a roll mill a couple times to help smooth out any remaining bits of nib that weren’t ground down. Their mill was built in 1939, and it’s their oldest machine (it was actually originally used as an ink refiner!)

Step Three: Temper the Chocolate to Make it Shiny and Smooth
Once the chocolate is smoothed out, it’s moved on to a machine to be tempered, which is the process that helps ensure chocolate comes out looking pretty and shiny and gives it that nice snap when it’s broken in half.

The temperature of the chocolate is first brought up between 80 and 90 degrees to remove any crystalization that may have already started to occur (since sugar and fat tend to crystalize in different ways and at different temperatures). The tempering machine basically equalizes crystalization so that it happens in a consistent way and so that the end product not only tastes good but looks good, too.
Step Four: Mold the Chocolate, Wrap it Up, and Ship it Out
Once the tempering process is complete, the chocolate is hand-poured into Raaka’s custom molds and left to set up. When it’s set, it’s broken out of the molds and inspected to ensure it has a nice even shape and that there aren’t any cracks or flaws. If it looks good, it gets wrapped up!

Raaka wraps all their chocolate onsite in a Swiss wrapping machine built in 1979. They can wrap around 300 bars an hour and tend to put out about 2,000 bars a day, Monday through Friday (though can do up to 3,000/day during the busier holiday season!)
Their wrappers also include all kinds of info inside, including where the cocoa beans came from and what they paid for them. They’re very transparent about how they source their beans, and the company is committed to purchasing beans at a price that is fair to farmers.
Step Five: Eat All the Chocolate
Now the chocolate is dressed up and ready to party. In your mouth, that is! You can stop by Raaka anytime to sample multiple varieties of their chocolate, and they encouraged us to come by often, as they’re always experimenting with new flavors. And yes, we totally sampled every single type of chocolate that they had on hand that day. Don’t judge, you know you’re gonna do that, too!

This tour is an excellent opportunity to taste all their chocolate, but if you can’t get to NYC anytime soon, you can look for their chocolate at a local retailer like Whole Foods, who is one of their largest clients (you may also get one of their mini bars on an upcoming JetBlue flight!) And, of course, you can find all their delicious flavors online.
******
If you are in the NYC area, though, I highly recommend stopping by. The tour is interesting and informative, and you’re free to sample their chocolate before, during, and after the tour, so it doesn’t get much better than that!
And if you’re feeling a bit more adventurous, you can sign up for one of their chocolate-making classes and get a first-hand experience with making chocolate yourself. I fully intend to get back there for their Chocolate Making 101 class in the very near future!
What do you think – do you want to check out Raaka Chocolate sometime soon now?
Or have you ever been to Raaka Chocolate or tasted any of their fantastic deliciousness? Let me know what you thought of it!
Plan Your Own Visit
Where to Go
- Raaka Chocolate: 64 Seabring St, Brooklyn, NY 11231
When to Go
- The factory is open for sampling and retail purchases Monday-Friday from 10:00 am to 5:00 pm and Saturday-Sunday from 12:00 pm to 6:00 pm
- Tours are offered Saturdays and Sundays at 1:30 pm and must be booked in advance.
- Chocolate-making classes are also offered on Saturdays and Sundays and require advanced booking. There is a beginner class and a more advanced class to choose from.
- You can also arrange for private events and classes by emailing bookings@raakachocolate.com
Tips for Visiting
- You’re welcome to stop by anytime to sample their chocolate. If you go every few months or so, you’ll be able to check out all their new flavors!
- This is an active factory, so if you plan to take the tour be aware that you need to wear long pants and closed-toe shoes. You’re asked to remove your jewelry in advance, and you’ll also be given a hairnet to wear during your tour.
- If you’re not able to stop by for a tour or class, you can always buy their chocolate online or find some at a local retailer!
- To learn more about Raaka Chocolate, you can also check out their FAQs.
